

The tour builder
Find your way around the builder, from the top bar and canvas to the storyboard and the panel on the right, and learn how each part saves.
The builder is where a tour turns into the story you want a buyer to see: which screens it shows, in what order, and what the viewer reads on each one. Your edits save as a draft while you work, and viewers keep seeing the published version until you push an update, so you can rework a live tour without anyone noticing.
You're in the right place when you've opened a tour and want to know what every part of the screen does.
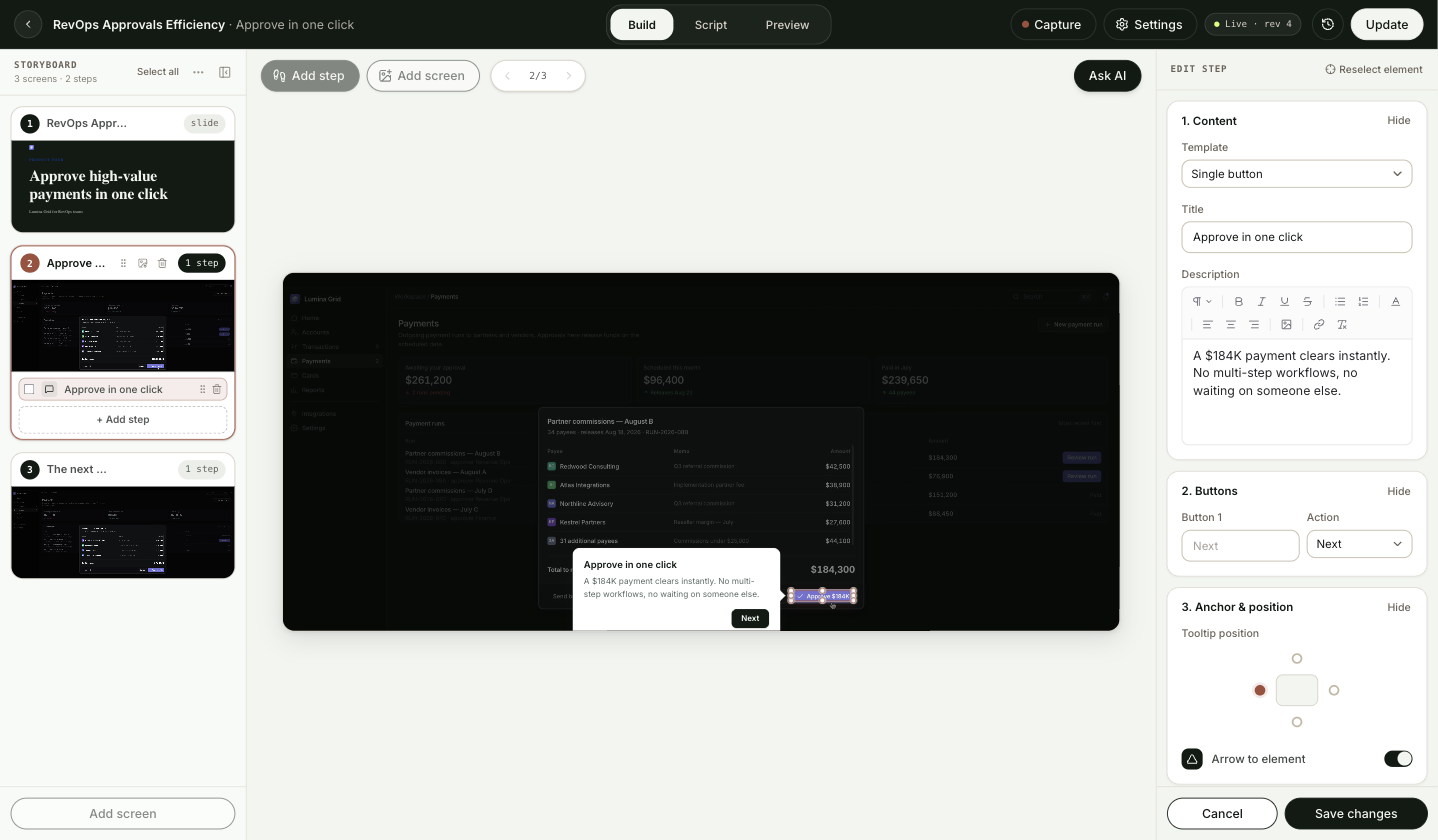
How do you open the builder?
Go to Tours and select Edit on a tour card. A new tour opens straight into the builder when you create it with Blank or Copy a tour, or when ShowPilot finishes assembling one from your captures. See Create a tour.
The builder has four areas:
| Area | Where | Use it for |
|---|---|---|
| Top bar | Across the top | The tour name, the three modes, capture instructions, tour settings, save state, revisions and publishing. |
| Storyboard | Left | Every screen in play order, with each screen's steps and actions underneath. |
| Canvas | Middle | The selected screen at its real shape, with the toolbar for adding steps and screens. |
| Right panel | Right | Opens only when something needs it: a step you're editing, an element you've clicked, Ask AI, a slide, or the tour's settings. |
What's in the top bar?
The left side shows a round back button (Back to Tours) and the name of what you're editing, written as the tour name, a dot, then the selected screen's name.
The middle holds the three modes:
| Mode | What it shows |
|---|---|
| Build | The editing surface, with the storyboard on the left and the canvas beside it. This is where you'll spend most of your time. |
| Script | The whole tour as a document you can read top to bottom and edit in place. See Script view. |
| Preview | Your current draft playing in the real tour player, full width under the top bar. It reloads by itself when ShowPilot finishes writing the script. |
The right side holds the rest:
| Control | What it does |
|---|---|
| Capture | Opens Capture a new shot, which explains how to record new screens with the ShowPilot Capture extension and bring them into this tour. It gives instructions only; it doesn't start a capture for you. |
| Settings | Opens the tour's settings in the right panel: name, style guide, display, voiceover, embed code and delivery. See Tour settings. |
| Save state | A quiet word that reads Saving…, Draft saved or Save failed while a step saves. |
| Live · rev N | Appears once the tour is published. N is the revision visitors are getting right now. |
| Revision history | The clock button next to the live chip. Lists every revision as Rev N with its date, and the current one marked live. Select an older one and confirm Roll back to republish it. |
| Publish / Update | Publish freezes your draft into the first revision. After that the button reads Update. While it works it shows Publishing…, then Published ✓, or Publish failed with the reason beside it. |
Rolling back republishes the old revision under a new number. Your draft in the builder stays exactly as it was. See Publish and revisions.
What's on the canvas?
The canvas shows the selected screen. It takes the shape of the window it was captured in, so a screen captured at 1440 by 900 keeps that shape. Screens with no recorded size use a wide 21:9 frame.
The toolbar at the top left of the canvas has:
| Control | What it does |
|---|---|
| Storyboard button | Shows the storyboard again after you've hidden it. It only appears while the storyboard is hidden. |
| Add step | A menu that adds a Guide, Lightbox or Link to the selected screen. Its heading says where the step goes, such as "Adds to Dashboard", plus the time on a video screen ("at 0:42"). It's greyed out on chapter slides, while a step is open, or before the tour has a screen. |
| Add screen | Opens Add screens, where you pick captures or add a chapter slide. |
| Screen arrows | ‹ 2/7 › steps through the screens without the storyboard. They show once the tour has two or more screens. |
Ask AI sits alone at the top right of the canvas. It opens a chat in the right panel that edits the current screen or the whole tour. See AI tools.
On a video screen, a timeline sits along the bottom of the canvas. See Video screens.
What opens the right panel?
The right panel stays closed until something needs it, so the canvas gets the full width. When more than one thing could show, it picks in this order:
- A step you're adding or editing: the step form. See Step settings.
- Ask AI, when it's open.
- An element you've clicked on an HTML screen: the element panel. See Edit what's on a screen.
- An action row you've selected in the storyboard, Find & replace, or Settings.
- A chapter slide, when one is selected: the slide panel. See Chapter slides.
Close a step form with Cancel or save it, and the panel moves on to the next thing in the list, or closes.
How does the storyboard work?
The storyboard on the left is the tour's running order. Its header reads Storyboard with a count such as "7 screens · 18 steps". Select the panel button in the header (Hide storyboard) to give the canvas more room.
Screen rows
Each screen is a card with a number, its name and a thumbnail. Slides show a live render of the slide rather than a picture. Select a card to show that screen on the canvas.
Hover a card to show its buttons:
| Button | What it does |
|---|---|
| Drag handle (Reorder screen) | Drag the card up or down to change where the screen plays. |
| Replace capture | Swaps the capture behind this screen. Not shown on slides. |
| Delete screen | Removes the screen and its steps from this tour after you confirm Delete screen?. The capture stays in your Captures library. |
| Step count | The chip that reads "3 steps". Select it to Show steps or Hide steps for that screen. Slides show a slide tag here instead. |
| Edit context | Hover the thumbnail itself. Opens the screen context editor, where you correct what the agent knows about this screen. See Screen context. |
Step rows
Open a screen's steps to see one row per step, numbered in play order, with an icon for its type and its title.
- Select a row to open the step's form on the right.
- Hover a row and the real step appears on the canvas, including its camera move, so you can check it without opening the form.
- A small camera badge (This step moves the camera) means the step zooms or pans.
- Hover to show the drag handle (Reorder step) and Delete step, which asks you to confirm.
- + Add step under the rows adds a step to that screen. This menu also offers Group, which the canvas toolbar doesn't.
Action rows
Actions you've added to elements, such as a click or a count-up, sit between the step rows. An action's position is its timing: an action above every step plays as the screen opens, and an action under a step plays with that step. Drag an action row to change when it plays. Hover it to watch it play on the canvas, and select it to change its delay or length. See Edit what's on a screen.
Select several steps
Select Select all in the storyboard header, or hover a step row and tick its box. Shift-click another box to add every step in between. The header then reads "4 selected", and the ⋯ menu can change all of them at once. See Step types for what the bulk menu sets.
Add screen at the bottom of the storyboard opens the same Add screens window as the canvas toolbar.
How do you add screens?
Select Add screen on the canvas toolbar or at the bottom of the storyboard. The Add screens window has two parts:
| Part | What it does |
|---|---|
| Chapter slide | Five tiles: Title card, Section break, Quote, Stat and Call to action. Selecting a tile adds that slide to the end of the tour straight away. See Chapter slides. |
| Product screens | Your captures, under Select screens. Tick as many as you need, then select Add 1 screen or Add N screens. They're added to the end of the tour in the order you ticked them. |
New screens land at the end. Drag them into place in the storyboard afterwards.
How do you replace the capture behind a screen?
Use this when the product changed and you've recaptured a screen, but you want to keep the steps you wrote for it.
- Hover the screen in the storyboard and select Replace capture.
- In Replace capture · (screen name), choose one capture under Pick a capture.
- Select Replace capture.
The screen's steps stay where they are. Any element edits you made on the old capture, such as hidden or rewritten text, are cleared, because they belonged to the old page. On an HTML screen, open each step afterwards and use Reselect element if a step no longer points at the right element.
How does saving work?
You never need a save button for the tour itself. Different edits save in slightly different ways:
| Edit | How it saves |
|---|---|
| A new step | Saves when you select Add guide, Add lightbox, Add link or Create group. Until then it isn't part of the tour. |
| An existing step | Saves by itself about a second after you stop typing, and the top bar shows Saving… then Draft saved. Save changes saves and closes the form. Cancel puts the step back the way it was when you opened it. |
| Voiceover narration | Waits for Save changes, because saving new narration makes a new recording. |
| Element edits, slides, screen order | Save as you make them. |
Which keyboard shortcuts work in the builder?
| Shortcut | What it does |
|---|---|
| ⌘Z (Ctrl+Z) | Undoes the last element edit on the current screen. |
| ⇧⌘Z (Ctrl+Shift+Z) or Ctrl+Y | Redoes it. |
| Esc | In Script, goes back to the canvas. |
Undo and redo cover element edits, such as hiding an element or changing its text, one screen at a time. They don't undo step edits, and inside a text box they work on the text as usual.
Test it
Your builder is set up the way you want when:
- You select Preview and the tour plays from the first screen to the last, in the order the storyboard shows.
- Hovering a step row in the storyboard shows that step on the canvas where you expect it.
- You edit an existing step, and the top bar shows Draft saved within a couple of seconds.
- After you select Publish or Update, the top bar shows Live with the new revision number.
Troubleshooting
| Issue | What to check |
|---|---|
| Add step is greyed out | Select a product screen first. Steps can't go on chapter slides, and you can't add a step while another step's form is open. |
| Add screen and the screen arrows are greyed out | A step form is open. Save it or select Cancel. |
| The right panel says "Finish or cancel the current step first." | You clicked an element while a step was open. Close the step, then click the element again. |
| The top bar says Save failed | Check your connection, then make the change again. |
| Publish fails with "has no text" | A step on the named screen has no title or description. Add words or delete the step, then publish again. |
| Replace capture is missing on a screen | Slides have no capture behind them, so they can't be replaced. |
FAQ
Do viewers see my edits as I make them?
No. Edits save to a draft. Viewers keep the published revision until you select Update.
Can I duplicate a screen?
Not in the builder. Duplicate the capture in Tours → Captures, then add the copy with Add screen. See Captures library.
Can I rename a screen?
Not from the storyboard. The name comes from the capture. You can change a capture's name in the screen context editor, opened with Edit context.
Does deleting a screen delete the capture?
No. The screen and its steps leave this tour, and the capture stays in your library for other tours.
What plays on a screen that has no steps?
It still plays. A picture or HTML screen holds for a few seconds, a video plays through, and a slide holds for its duration, then the tour moves on.
Does the Capture button record straight into this tour?
Not yet. It explains the steps: capture with the extension, then bring the new screens in with Add screen.